We did it! After four years of waiting for this kitchen renovation we finally ordered our Ikea kitchen!!! I’m doing a happy dance even typing this! We priced lots of low budget kitchens and nothing came close to the value and quality of Ikea. If this is something you are thinking about doing, than this is the post for you. Be warned, it’s a long one…and it’s jam packed with loads of tips and tricks, including what I think the biggest flaw is!
The Design Stage
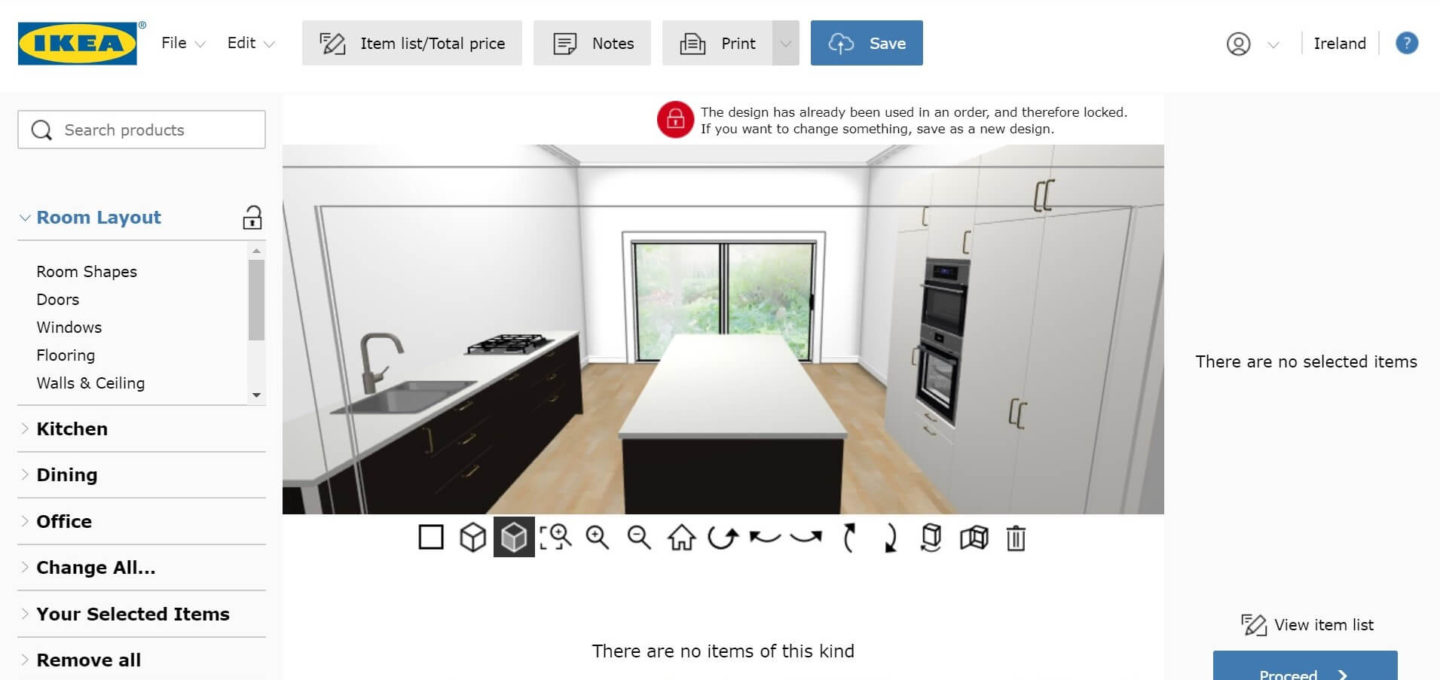
First up, measure your space correctly, including any doors and windows. You’ll be able to input it exactly into the Ikea 3D planner so you might as well get it right from the beginning. Then find yourself a laptop or a desktop as you won’t be able to do this on your phone. And finally, remember to stay calm, as at times, the planner is PAINFULLY slow and has been known to crash. So save your work often.
Spend a long time in this design stage, it’s the most important part. Try out different sizes and shapes of cabinets. It can be a little like a jigsaw puzzle to get everything to fit together as you like it. Ikea sells filler panels that match your doors, so if you have a small gap somewhere don’t worry. If you don’t know where to start, start with your sink! Remember it usually functions best to have the dishwasher and the bins on either side of your sink.
The type of cabinets you’ll be using are the Metod cabinets. These come in a variety of sizes and shapes, including corner cabinets and ones specifically designed for sinks and appliances. I love that you can design the inside of each cabinet as you wish…drawers, shelves or a combo of both. It’s well worth thinking through where you think you’ll put everything and then you can design the cabinet to suit perfectly.
There are a few inserts you can buy for the drawers and shelves to make storage even more efficient. I’ll be showing you more about that when the kitchen is installed. Ooh and I LOVE that you can install cabinet lights inside that turn on when you pull out the drawer. We absolutely bought a few of those!
An Appointment with an Ikea Kitchen Designer

You cannot buy an Ikea kitchen without going in and making an appointment. Each appointment is two hours long and while that may seem like a long time, trust me it flies. Make sure you know your Ikea login and password as they will ask you to log in to see your design (if you have one). Our design was fully complete before we went and somehow we were still rushing at the end. The designers are so thorough, it’s brilliant! If you aren’t a fan of the planner and you have no design to show them, be prepared to make a second appointment as chances are you won’t be finished designing your kitchen in time.
If you live near Dublin, Ikea have a service where they can visit your house, measure and design your kitchen right there! It €100 but that’s refundable when you buy the kitchen.
The appointment times in Dublin get booked up really quickly and you can only book them online. Don’t have a panic attack (like I did) when you can’t see an available slot for months. Instead, check back on a Friday (morning, I think) where they input all the available appointments for the next month, including any last minute cancellations.
Ikea Kitchen Appliances
Did you know that the Ikea kitchen appliances are made by either Whirlpool or Electrolux? After A LOT of research, I can tell you not to buy the bottom price range, but the mid-high priced appliances seem to get good reviews and give a good warranty. Reviews can be really hard to find online.
We were planning on buying a lot of our appliances in Ikea but in the end we got better deals in the Christmas sales elsewhere. The only appliance we did buy was the Rengora dishwasher. If you are planning on integrating your dishwasher using Ikea cabinets, you have to get an Ikea dishwasher. Otherwise, you’ll have a problem attaching the door so it can smoothly open and close.
Countertops
Ikea have a good range of countertops, however we wanted something different and this is when I found the main flaw with the Metod kitchen. All other kitchen companies have cabinets that are approx 55cm deep. This means you can hang a door, have a little overhang and still be able to add a countertop that is 60cm deep.
However, the Ikea cabinets are already 60cm. Which means you’ll need a countertop with a minimum depth of 63.5cm. This is a big problem because most countertops sold outside of Ikea are 60cm deep max. The only laminate I’ve been able to find that would work is Topform. Other than that, you’ll probably have to go custom stone. (If you know of another brand that would work, please leave a comment!) Ikea countertops are of course 63.5cm deep, so it is much easier to buy directly from them!
Cabinet Doors
Ikea have a huge choice of cabinet doors. We are going for the Kungsbacka in black and a few Veddinge white cabinets. Remember the mood board? I’ve been dreaming of a matte black kitchen for four years, so I was practically giddy when they started selling this last year. Because we’re using black doors, we bought the cabinets in a dark brown colour instead of the usual white. Tip: Last year, on a trip to Ikea, I bought the smallest drawer front in each of these colours. They cost about €10, but they’ve been so handy to have as a sample when deciding everything else like the countertops and floors.
If you’re not a fan of any of the doors they have on sale, there are some companies that sell cabinet doors specifically for Ikea kitchens. I haven’t needed to use them but I’ve heard really good reviews about Plykea, Superfront and Custom Fronts. They are more expensive than Ikea, but they do give a wow factor!

Plykea 
Custom Fronts 
Superfront
Tip: Do not buy the door handles in Ikea. They scream flatpack and you can get some really gorgeous handles that will make your kitchen look bespoke.
Installation
You have two options here. You can hire someone to install the kitchen for you. Ikea can give you a phone number of someone they recommend in your area and the price is dependant on the size of your kitchen. I was quoted about €1000. You may be able to find someone in your area who could install it for you for cheaper.
Secondly, you can install it yourself. This is the option we’re going to try. We know that this may be completely out of our skill set, so if we are botching it up, the plan is to call in a professional. An Instagram follower warned me that if we install the kitchen ourselves the kitchen warranty is void. Perhaps that was in the past, as I emailed Ikea and they have assured me that if you DIY this kitchen, the warranty absolutely holds. I’m really glad I checked out though, so thanks to that follower!
Paying for the Ikea Kitchen
You might be wondering why paying for the kitchen has it’s own heading but I have a few tips worth noting!
- Make sure to use your Ikea family card when buying your kitchen. If you don’t have one, get one!! The huge benefit to this is that is insurance for your kitchen WHILE IT IT BEING TRANSPORTED AND ASSEMBLED. This means that if you damage one of your cabinets while assembling, Ikea will replace it for free. It’s valid for 90 days after the kitchen is delivered. It’s an absolutely amazing service that most people are not aware of.
- I’m not sure about elsewhere in the world, but in Ireland you can only buy your kitchen using one card transaction. You may pay fully in cash or you may split the cost between cash and one bank card. But you cannot use two cards and you cannot use a cheque. You may need to ask your bank for an increase on your daily limit as most cards wouldn’t cover it.
- Once the order has been paid for, it cannot be changed. So even if you have forgotten a hinge, you’ll have pay for another delivery. Delivery cost us €74 which is just mad for a whole kitchen. Because of the problem with the sliding door, we had to change the date of delivery a FOUR times but it was so easy to do. No exaggeration, I timed Trevor once and it took him less than 30secs to change the date and a time slot to suit us.
To Finish Up…

As I write this, our kitchen is arriving tomorrow!!! It will be another week before we start putting it together but we couldn’t be more excited!!! Let me know if you have any questions about assembling this bad boy as you know I’ll be writing a detailed post on that one!! The biggest thing we’ve put together so far is our Ikea Pax wardrobe, so wish us luck for this!! 🙂


